console.systems

How to remove all SoundCloud likes at once

Friday, September 30, 2016

How so there is no way to track which tracks I listened? There are various “SoundCloud History” browser extensions, but every other streaming service has that (I know only YouTube) out of the box.

UPDATE Nov 2016: It took only few years of whining to get Listening history. Good job SoundCloud!

So my workaround is to use the Like button. I basically like every track in my stream I listened. And to keep it clean and tidy once in a while I remove all the likes to start fresh. Yet even removing all the likes at once is not possible. I just love the tech support answer:

You can’t do that. Hope that helps.

Helps a lot!

The solution is to run a simple jQuery line. Go to soundcloud.com/you/likes, then open browser console (usually F12) and put:

$(".sc-button-like[title='Unlike']").click();

What it does is that it goes through every Unlike button and clicks it. It may take a while if you have many likes.

UPDATE Apr 2017: Looks like SoundCloud does not expose jQuery anymore, so there is a dependecy free solution:

(async function() {
    while (true) {
        var a = Array.from(document.querySelectorAll(".sc-button-like[title='Unlike']"));
        if (a.length == 0)
            break;
        a.forEach(button => button.click());
        // wait 2 seconds before more tracks get loaded:
        await new Promise(resolve => setTimeout(resolve, 2000));
    }
})();

WARNING: Snap, SoundCloud decided to disable my Liking abilities for who knows how long:

We’ve noticed a high volume of liking coming from your account and we would like to ask that you slow down. If your account is performing many more actions when compared to most others, it loses the human touch. Remember that there is a fine line between promoting yourself and bombarding other users with notifications. We want our community to remain a genuine, positive place for members to interact, so remember to stick to our Community Guidelines. You can continue liking again in 5 hours. The more you hit these limits, the longer the block will last.
Debian Time Machine

Tuesday, February 10, 2015

I wish there would be a standard tool in Debian or Ubuntu to list all the packages installed since certain date. So that I could use that information to rollback the system state to its original or even a fresh-install state.

Luckily there is a log written with every ever installed, upgraded or removed package by dpkg or apt-get, which can be found at /var/log/dpkg.log. I wrote a simple script that parses the logs and extracts the packages names.

So to list all the packages installed from the beginning of the year:

$ ./dpkg-since.py -n 2015-01-01

Or to clean up the system from anything installed during last two hours:

$ sudo apt-get remove `./dpkg-since.py 2 hours`

How to pair a Low Energy (LE) Bluetooth device in dual boot with Windows & Linux

Thursday, September 18, 2014

Those who dualboot know the pain of re-pairing your keyboard or mouse everytime you boot to a different OS. In this tutorial I will show how to pair a LE Bluetooth mouse in both Windows 8 and Debian simultaneously.

First pair the device in Debian, then reboot in Windows and pair the device there too. Yes, this will reset the paring in Debian, just carry on. Now we need to access the pairing keys in Windows. Download psexec.exe and open a command prompt with Administrator rights.

> cd Downloads
> psexec.exe -s -i regedit /e C:\BTKeys.reg HKEY_LOCAL_MACHINE\SYSTEM\ControlSet001\Services\BTHPORT\Parameters\Keys

The keys should be now exported to C:\BTKeys.reg. You should get something like:

Windows Registry Editor Version 5.00

[HKEY_LOCAL_MACHINE\SYSTEM\ControlSet001\Services\BTHPORT\Parameters\Keys\7512a3185b2c\84abd4a25ee1]
"LTK"=hex:6c,54,ee,80,40,47,6c,cb,fc,8e,f3,f1,c6,b2,04,9e
"KeyLength"=dword:00000000
"ERand"=hex(b):1e,12,aa,37,39,cc,af,34
"EDIV"=dword:00003549
"CSRK"=hex:38,d7,aa,c1,42,06,31,25,12,b8,5a,6d,c3,90,98,f2

7512a3185b2c is the MAC address of the Bluetooth adapter, which can also be written in standard format as 75:12:A3:18:5B:2C. 84abd4a25ee1 is the mouse address that was assigned during the pairing. We will need those numbers in the next steps.

Now boot again to Debian. The mouse wont paired automatically, because it is now assigned to a different address and with different keys. Let’s fix it.

$ cd /var/lib/bluetooth/75:12:A3:18:5B:2C/
$ ls
cache 84:AB:D4:A2:5F:E1 settings

If you look closely, the mouse address is not the same as in Windows. In my case only the fifth group is different. We need the device addresses to match, so rename the file.

$ mv 84:AB:D4:A2:{5F,5E}:E1
$ cd 84:AB:D4:A2:5E:E1/
$ ls
attributes gatt info

Now open the info file for editing and update the keys values. The relation between Windows and Bluez keys format is as follows:

At the end you should get this.

[LocalSignatureKey]
Key=38D7AAC14206312512B85A6DC39098F2

[LongTermKey]
Key=6C54EE8040476CCBFC8EF3F1C6B2049E
Authenticated=0
EncSize=0
EDiv=13641
Rand=3796477557015712286

Save the changes and reboot. From now on Debian and Windows will connect the mouse automatically. Awesome!

P.S. Mygod was nice to turn the instructions into a Python script, try it out.

Force Qt apps to use the currently selected Gnome 3 icon theme

Wednesday, February 26, 2014

Gconf, Dconf, Gsettings too many settings storages for Gnome. Although the latest Gnome 3 uses GSettings only, Qt 4.x still relies on Gconf from Gnome 2.x. So changing the icon theme in Gnome 3 doesn’t affect Qt apps. What you need is to copy the theme name from Gsettings to GConf via this command:

$ gconftool-2 --type=string --set "/desktop/gnome/interface/icon_theme" `gsettings get org.gnome.desktop.interface icon-theme | tr -d "'"`

and restart the Qt app.

How to paste from PRIMARY selection buffer via keyboard shortcut

Monday, February 17, 2014

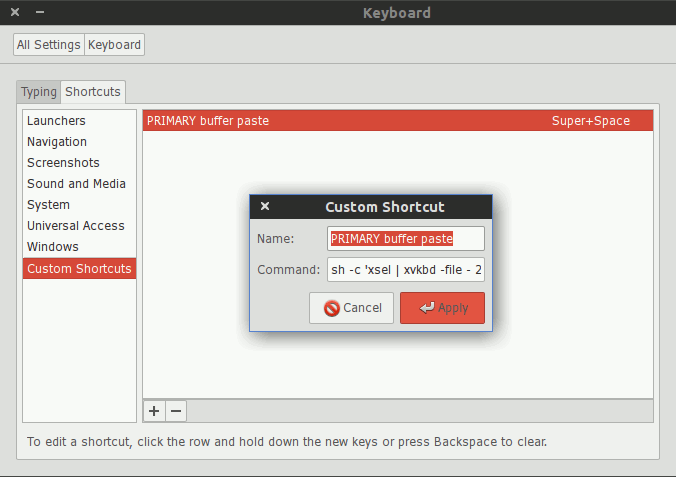
In your desktop environment of choice, go to keyboard shortcuts setting and create a new shortcut with the command:

$ sh -c 'xsel | xvkbd -file - 2>/dev/null'

and set the desired key combination.

<- Newer Posts Older Posts ->